
Tips for Spring & Summer: Utilizing Nature’s Bounty
May 13, 2015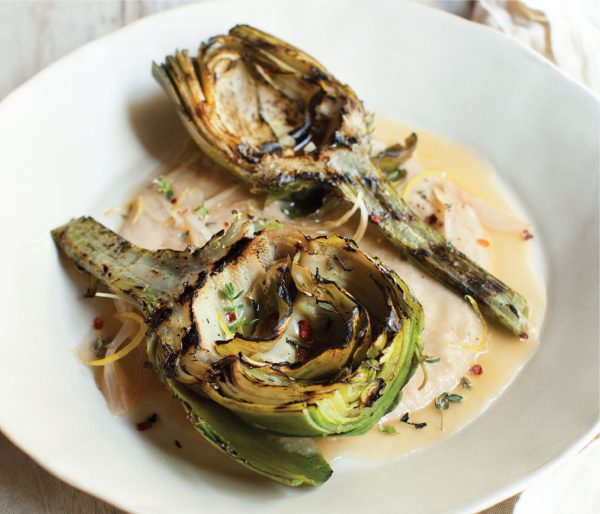
“I was brought up to follow a very simple style of cookery. In a composed menu, I want to recognize the ingredients on the plate. I want to know, what end of which season it is and where I am. Am I in the north, the south, in the mountains, or on the coast? I want flavor to flower and stimulate, and taste to lie subtle and clean. An ingredient harvested at the peak of its ripeness will impart aromas and flavors that stimulate the senses as you bite it. And, as whatever you are chewing divulges itself to nose, teeth, and tongue, your palate will be the judge of the product’s freshness and vitality.”
— Daniel de la Falaise, from Nature’s Larder: Cooking with the Senses
The following recipes are from The Ranch at Live Oak Cookbook: Delicious Dishes from California’s Legendary Wellness Spa:

Quinoa Salad with Spring Vegetables and Herbs
This lemony quinoa salad features the best of spring—asparagus, snap peas, radishes, mint, dill, green onion, and green garlic, which is mild, tender young garlic.
Makes 4 to 6 servings
Ingredients:
1 cup quinoa, rinsed and drained
1 teaspoon sea salt
1 bunch asparagus (about 1 pound)
2 cups sugar snap or snow peas, trimmed and thinly sliced on an angle
1 bunch radishes, trimmed and sliced (reserve tops for garnish)
1/4 cup loosely packed fresh mint leaves
1 scallion, thinly sliced
2 tablespoons coarsely chopped fresh dill
1 tablespoon minced green (spring) garlic, or 1 garlic clove, minced
2 tablespoons extra-virgin olive oil
1/2 teaspoon lemon zest
2 tablespoons fresh lemon juice
1 cup radish tops or wild arugula leaves, for garnish
Lemon wedges, for garnish
Nasturtium flowers and leaves, for garnish (optional)
In a heavy medium saucepan, bring 2 cups water, the quinoa, and 1/2 teaspoon of the salt to a boil over medium-high heat; reduce the heat and simmer until the liquid has reduced by half, about 10 minutes. Reduce the heat to low, cover, and cook until the quinoa is tender and the water has been absorbed, about 10 minutes longer. Transfer the quinoa to a large bowl and let stand until cooled to room temperature.
Fill a large skillet with 1 inch of salted water and bring to a simmer over high heat. Add the asparagus, cover, and cook until crisp-tender, about 2 minutes. Using tongs, transfer the asparagus to a bowl of ice water to cool. Drain the asparagus and pat dry with a clean kitchen towel. Cut the asparagus on an angle into 1-inch pieces and add to the quinoa along with the peas, radishes, mint, scallion, dill, and garlic.
In a small bowl, whisk together the olive oil, lemon zest and juice, and remaining 1/2 teaspoon salt to blend. Pour the dressing over the salad and stir to combine.
(The salad can be prepared up to 1 day ahead. Cover and refrigerate.)

Grilled Artichokes with Garlic Broth and White Bean Brandade
You can serve the delectable grilled artichokes with the fragrant broth for an appetizer or side dish, but when paired with the creamy brandade and a lemon-dressed arugula salad, you have a feast.
Makes 4 servings
Ingredients:
For the Brandade:
1 tablespoon extra-virgin olive oil
1 medium onion, chopped
4 garlic cloves, chopped
2 (15-ounce) cans cannellini beans, drained and rinsed
2 teaspoons fresh rosemary leaves
1/2 teaspoon lemon zest
For the Artichokes and Garlic Broth:
4 large artichokes with stems
3/4 cup low-sodium vegetable broth
1 medium shallot, sliced
4 garlic cloves, thinly sliced
1 tablespoon white wine vinegar
1/2 teaspoon lemon zest
Extra-virgin olive oil, for brushing
2 tablespoons chopped fresh flat-leaf parsley leaves
2 teaspoons chopped fresh thyme
Lemon wedges, for serving
In a small heavy saucepan, simmer the broth with the shallot, garlic, vinegar, and lemon zest over medium heat until the broth has reduced to 1/2 cup, about 3 minutes; reserve. (The broth and artichokes can be prepared up to 1 day ahead; cover separately and refrigerate.)
Preheat an outdoor grill to medium heat or a cast-iron grill pan over medium-high heat.
Brush the artichokes lightly with olive oil. Grill the artichokes until golden brown, about 3 minutes per side; set aside.
Meanwhile, bring the garlic broth to a simmer. Return the white bean puree to a skillet and stir over medium until heated through. Divide the brandade among shallow bowls and top with the grilled artichokes. Spoon the broth over the artichokes and around the brandade. Sprinkle the parsley and thyme over the artichokes, garnish with the lemon wedges, and serve.
Make the Brandade:
Heat the oil in a large heavy skillet over medium-high heat. Add the onion, cover, and cook until just tender, about 2 minutes. Uncover the pan, add the garlic, and sauté until the onion is golden brown, about 4 minutes. Stir in the beans, 2/3 cup water, the rosemary, and the lemon zest and simmer briefly to blend the flavors, about 2 minutes.
Carefully transfer the white bean mixture to a food processor fitted with the metal blade and puree until smooth. (The brandade can be prepared up to 3 days ahead; cover and refrigerate.)
Make the Artichokes and Garlic Broth:
With a sharp knife, trim 1/4 inch from the artichoke stems. Pull off the tough outer leaves. Trim off the top 11/2 inch from each artichoke; use kitchen scissors to snip off any sharp edges on the remaining leaves.
In a large pot fitted with a steamer basket, steam the artichokes until just tender when pierced with a small, sharp knife, about 12 minutes. Using tongs, remove the artichokes from the steamer and let stand until cool enough to handle. Cut the artichokes lengthwise in half; remove the chokes.
In a small heavy saucepan, simmer the broth with the shallot, garlic, vinegar, and lemon zest over medium heat until the broth has reduced to ó cup, about 3 minutes; reserve. (The broth and artichokes can be prepared up to 1 day ahead; cover separately and refrigerate.)
Preheat an outdoor grill to medium heat or a cast-iron grill pan over medium-high heat.
Brush the artichokes lightly with olive oil. Grill the artichokes until golden brown, about 3 minutes per side; set aside.
Meanwhile, bring the garlic broth to a simmer. Return the white bean puree to a skillet and stir over medium until heated through. Divide the brandade among shallow bowls and top with the grilled artichokes. Spoon the broth over the artichokes and around the brandade. Sprinkle the parsley and thyme over the artichokes, garnish with the lemon wedges, and serve.

Eggplant Cannelloni with Spicy Tomato-Basil Sauce and Caramelized Onions and Kale
This is a good dish for entertaining as it can be made completely ahead. Try the mildly spicy tomato sauce on whole grain gluten-free pasta and sautéed kale if you are running short on time.
Makes 4 to 6 servings (12 rolls)
Ingredients:
For the Spicy Tomato-Basil Sauce:
1 tablespoon extra-virgin olive oil
1/2 red onion, chopped
2 garlic cloves, chopped
1/4 teaspoon crushed red pepper flakes
2 (15-ounce) cans diced tomatoes
2 tablespoons chopped basil leaves
Sea salt and freshly ground black pepper
For the Eggplant Rolls:
2 large eggplants (about 18 ounces each),
cut lengthwise into 1/4-inch-thick slices
1/4 cup plus 1 tablespoon extra-virgin olive oil
Sea salt
1 cup diced zucchini or yellow squash
1 cup diced red bell pepper
4 garlic cloves, minced
Freshly ground black pepper
2 cups cooked quinoa
1/4 cup pine nuts
1/2 teaspoon dried oregano, crumbled
1/4 cup low-sodium vegetable broth
For the Caramelized Onions and Kale
1 teaspoon extra-virgin olive oil
1 cup thinly sliced onions
1/4 teaspoon crushed red pepper flakes
4 cups firmly packed torn kale leaves (about 4 ounces)
1 cup low-sodium vegetable broth
2 tablespoons minced garlic
1 teaspoon unfiltered apple cider vinegar
Sea salt and freshly ground black pepper
Make the Spicy Tomato-Basil Sauce:
Heat the oil in a heavy medium saucepan over medium/high heat. Add the onion, garlic, and crushed red pepper and sauté for 2 minutes.
Add the tomatoes and half of the basil and simmer until reduced to about 3 cups, stirring occasionally, about 20 minutes. Season to taste with salt and black pepper. Let cool, and then stir in the remaining basil. (The sauce can be made up to 1 day ahead; cover and refrigerate.)
Make the Eggplant Rolls: Preheat the broiler. Arrange the eggplant slices on two large baking sheets in a single layer. Using a pastry brush, lightly coat the eggplant slices with ¼ cup of the oil. Sprinkle with salt. Broil without turning until the eggplant is soft and slightly browned, watching carefully to prevent burning, about 5 minutes. Let cool completely.
Heat the remaining 1 tablespoon oil in a large heavy skillet over medium-high heat. Add the zucchini, bell pepper, and garlic and sauté until tender, about 5 minutes. Season to taste with salt and black pepper. Mix in the quinoa, pine nuts, and oregano. Stir in the broth, remove from the heat, and let cool. Using your hands, knead the quinoa stuffing mixture until all the ingredients are well moistened. Season to taste with more salt and black pepper.
On a work surface, place 1 eggplant slice, browned side facing down, with the wide, rounded end closest to you. Place 2 tablespoons of the stuffing on the rounded end and roll the eggplant up and away from you. Place the roll seam-side down on a large heavy baking sheet. Repeat with the remaining eggplant and stuffing. (The rolls can be made up to 1 day ahead; cover and refrigerate.)
Make the Caramelized Onions and Kale:
Heat the oil in a large nonstick skillet over medium heat. Add the onions and crushed red pepper and cook until the onions are golden brown, stirring frequently, about 10 minutes. Add the kale, broth, and garlic and cook until the kale is tender and the mixture is caramelized, stirring occasionally, about 20 minutes.
Add the vinegar and cook for 1 minute. Season to taste with salt and black pepper.
(The kale and onions can be made up to 2 hours ahead. Set aside at room temperature.)
Preheat the oven to 350°F. Uncover the eggplant rolls, if refrigerated, and bake until heated through, about 15 minutes. Bring the tomato sauce to a simmer. Spoon about
1/3 cup of the sauce onto each serving plate and top each pool of sauce with 2 or 3 eggplant rolls. Spoon the caramelized onions and kale over the rolls and serve.

Watermelon, Lime, and Hibiscus Ice Pops
Dried hibiscus flowers produce a lovely crimson-colored tea that makes an amazing refresher poured over ice on a summer day. It’s super tart (and packed with vitamin C). Here we mellowed it with watermelon and turned it into ice pops that are fun for kids and adults.
Makes about 6 ice pops
Ingredients:
1/4 cup dried hibiscus flowers (see Note)
2 1/2 cups watermelon chunks (from about 1 1/4 pounds watermelon or 1/2 mini watermelon)
1/4 cup raw agave nectar
1/2 teaspoon lime zest
3 tablespoons fresh lime juice
In a small saucepan, bring 3/4 cup water and the dried hibiscus flowers to a simmer. Turn off the heat and let stand until cool. Pour through a fine-mesh sieve into a bowl.
In a food processor, blend the watermelon chunks until liquified. Strain through a fine-mesh sieve lined with muslin into a pitcher; discard any solids. (You should have about 1 1/2 cups watermelon juice.)
Stir the hibiscus water, agave nectar, and lime zest and juice into the watermelon juice.
Pour the juice mixture into ice pop molds and freeze until firm, about 7 hours.
The following recipes are from Breakfast: Recipes to Wake Up For:

Fig Jam
Fresh figs were one of my mother’s favorite summertime snacks—people at the beach we went to in North Carolina grew them alongside their beach houses, and my mother would sneak along the sides of their houses and snag fat, ripe figs from their trees and eat them on the spot. This jam uses dried figs, which I find at Sahadi’s, a famous Middle Eastern market in Brooklyn—a far cry from the bright sands of Wrightsville Beach. The figs aren’t much like the juicy ones my mother used to steal, but they make a nice jam that goes beautifully with cured country ham and aged cheese.
Yields 3 cups
Ingredients:
1 lb dried figs
1/4 cup molasses
1/2 tsp kosher salt
1 tsp black pepper
1 1/2 tsp whole grain mustard
1 1/2 tsp white sugar
Cut the stems off the figs and discard.
Combine figs and all other ingredients in a saucepan, and stir well. Add water just to cover.
Bring the figs to a simmer over medium heat, then lower heat and cook slowly. Add water as necessary to keep the jam from sticking or burning. Cook until figs have broken down somewhat (an hour or so).
Purée gently with an immersion blender or in a food processor, so that jam has a sticky but spreadable consistency.
Cool and store in the refrigerator for up to two weeks.

Blueberry Grunt
During my childhood summers, we’d often be in the fortunate position of having more blueberries than we knew what to do with. That’s when my mother would make this cake for us to eat morning, noon, and night.
Generously serves 9
Ingredients:
2 2/3 cups cake flour, divided
2 tsp baking powder
1/2 tsp kosher salt
2 sticks (1/2 lb) unsalted butter
2 cups turbinado sugar
4 eggs
1 cup milk
1 1/2 tsp vanilla
1 quart blueberries
Preheat oven to 350ºF. Lightly butter and flour a 9×13-inch pan.
In a large bowl, sift together 2 1/3 cups of the cake flour, baking powder, and salt. Set aside.
Beat butter and sugar together with an electric mixer at medium speed until they are light and creamed. Reduce the speed to low, then add the eggs, one at a time, being sure that each egg is fully incorporated before adding the next. Add the dry ingredients in thirds, alternating with 1/3 cup of the milk. Add vanilla. Finally, toss the blueberries with the reserved 1/3 cup of flour and fold them into the cake mixture.
Bake for 50 minutes, rotating after 25 minutes, until a tester comes out clean and the cake springs back slightly when gently touched. Most of the blueberries will sink to the bottom of the pan as the cake cooks.

Spring Vegetable Hash
Hashes aren’t just for heavy meats. They make a good backdrop for vegetables, too.
Serves 4
Ingredients:
1 bunch broccoli rabe around 6 stalks
4–6 radishes
1 tbsp unsalted butter kosher salt
black pepper
1 tbsp + 2 tsp oil
1/2 tsp lemon juice optional
4 hash browns
1/4 cup hard or semi-hard cheese, grated cheddar or aged gouda
6 spring onions or scallions, chopped
Trim off any dry or woody ends of the broccoli rabe and split the stalks into pencil-thick pieces if they’re thick. Trim the greens off the radishes and cut them into quarters or sixths.
In a small sauté pan, heat the butter over medium heat until it’s foaming.
Add the radishes and sauté until they’re browned at the edges and tender.
Remove from the butter and season with salt and pepper.
Wipe out the sauté pan and heat a teaspoon of oil over medium-high heat. Add the broccoli rabe and some salt, pepper, and lemon juice to taste. When the stalks are tender and the florets lightly seared, remove from heat and set aside while you cook the potatoes.
In a larger skillet or griddle, heat a tablespoon of oil over medium-high heat. Smash the hash browns down on the oiled griddle. When the potatoes are browned and crispy on the bottom, divide the cheese among the pieces and allow to melt for a minute before adding the vegetables. Lay the broccoli rabe and radish on half of the hash browns. Scatter the scallions throughout the pan, allowing some to sear on the surface and some to stay more or less raw on top of the potatoes. When the cheese is melted, fold each hash in half and transfer to a plate with a spatula. Serve with eggs or a salad or on its own.
The following recipe is from Mich Turner’s Cake School: The Ultimate Guide to Baking and Decorating the Perfect Cake:

Orange Chiffon Cake
This cake is all about the orange and is delicate, moist, melt-in-the-mouth, light, fluffy, and full of flavor. Serve with fresh summer fruits and ice cream or sherbet. It keeps very well and can be refrigerated.
Makes one 10-inch round cake
Ingredients:
1 1/3 cups all-purpose flour
1/3 cup cornmeal
1 1/2 cups golden superfine sugar
1 tablespoon baking powder
2 tablespoons freshly grated orange zest
6 large eggs yolks, plus 1 large egg white
1/2 teaspoon cream of tartar
1/2 cup sunflower oil (or canola or corn oil)
3/4 cup freshly squeezed orange juice, strained
2 teaspoons vanilla bean paste
1 teaspoon natural orange oil
Vanilla sugar, to finish
Fresh berries, to serve
Preheat the oven to 325° F. You will also need a 10-inch tube pan, ungreased.
Place the flour, cornmeal, 1 1/4 cups of the sugar, the baking powder, and orange zest in a large bowl and beat until combined.
Make a well in the center and add the egg yolks, oil, orange juice, vanilla bean paste, and orange oil. Beat until you have a smooth batter.
In a separate bowl, whisk the egg whites until just foaming. Add the cream of tartar and continue to whisk until soft peaks form.
Add the remaining sugar a teaspoon at a time while continuing to whisk until the sugar is fully incorporated and the meringue is glossy and stiff. Fold the egg white foam into the batter in three additions until fully incorporated.
Pour into the tube pan or ring mold and bake for 55 minutes, or until risen, golden brown, and a cake skewer inserted into the center comes out clean.
Place an upturned glass bowl on the work surface. Invert the cake in the pan onto the glass bowl and let cool.
Run an offset spatula around the outside and inside and carefully remove the cake. Place on a cake stand and dredge heavily with vanilla sugar. Serve with fresh summer berries.
Storage: This cake keeps extremely well stored in the refrigerator for up to 5 days without drying out.
Vanilla sugar:
To make your own, decant a box of confectioners’ sugar into a storage jar. Split a vanilla bean with a sharp knife and place the bean inside the jar. Seal the jar to allow the sugar to take on the vanilla flavor.
Summertime Gatherings: Food from the Sea
The following recipes are from Real Maine Food: 100 Plates from Fishermen, Farmers, Pie Champs, and Clam Shacks:

Grilled Lobster with Garlic Butter
In the summertime, we’ll take any excuse we can to cook outside rather than stay cooped up in the kitchen. For this reason, we often find ourselves attached at the hip to a charcoal grill during our free time. Luckily, surf fares just as well on the grill as turf does, and split grilled lobster emerges from the grill with beautiful char lines and glistening meat. Of course, you can make this recipe on a gas grill as well. But charcoal truly imparts a richer, smokier flavor and makes the extra effort necessary for grilled lobster all the more worth it.
Serves 4
Ingredients:
Seawater, or 2 tablespoons fine sea salt (if seawater is unavailable)
4 (1 1/4 – to 1 3/4 -pound) live Maine lobsters
1 cup (2 sticks) unsalted butter
2 teaspoons minced garlic
Juice of 1 lemon
Fine sea salt and freshly ground black pepper
Neutral oil, such as canola or grapeseed, for the grill
You can’t escape the kitchen entirely; you’ll need to partially steam the lobsters so you don’t end up with a nicely grilled outside but raw lobster meat inside.
Follow the recipe for Simply Steamed Lobster (below), but steam the lobsters for only about 5 minutes if you’re using new shell lobsters, or 6 minutes if you’re using hard shell. While the lobsters are steaming, fill another pot or the sink with ice and water. Drop the steamed lobsters in the ice bath to stop them from cooking any further.
While the lobster is cooling, fire up your grill and spread your coals evenly across the bottom of the grill—you’ll be placing the lobster on your grill grate directly above the hot coals. We highly recommend using a charcoal chimney starter to get your coals burning.
Use a sturdy, sharp chef’s knife to slice the lobsters lengthwise all the way through into two halves.
Clean out the tomalley (that gooey green stuff, which is basically the lobster’s organs in suspension) from the body. With the same knife, cut small slits in the claws to help the heat penetrate the shell. In a small saucepan, melt 1/2 cup of the butter over low heat.
Pour it into a dish and mix in the garlic and half the lemon juice. Brush the exposed meat with the butter mixture, then sprinkle on a little salt and a few grinds of fresh pepper (grinding the pepper fresh onto the meat will make a noticeable difference in your lobster’s flavor).
Clean and lightly oil your grill grate. The easiest way to do this is to apply some oil to a folded paper towel and, holding it with tongs, rub it over the grill grate.
Depending on the size of your grill, you may be able to cook all four lobsters at once, in pairs, or one at a time. When the charcoal flame has died down and the coals are glowing orange and hot, lay the lobster halves on the grill, flesh-side down, and grill for about 5 minutes. Then turn them over, brush on more of the butter mixture, and grill for 5 minutes more. When finished, the meat should be firm and opaque all the way through. If working in batches, return the finished grilled lobster to the steaming pot (without the water) and cover to keep warm until ready to serve.
In the small saucepan you used earlier, melt the remaining 1/2 cup butter. Pour it into a dish and add the remaining lemon. Serve your lobster with lemon butter on the side, plucking the tails straight to your mouth and using your hands or a cracker to get at the claw and knuckle meat.
Simply Steamed Lobster:
Choose a pot with a tight-fitting lid, large enough to fit all your lobsters comfortably with room at the top. For four lobsters, a 5-gallon pot will do. The classic lobster pot is graniteware, enamel-coated steel with a speckled black finish, but any metal pot will work just fine. Fill the pot with about 2 inches of water. If you happen to be next to the sea, get salt water straight from the source; otherwise, mix in the salt. Bring the water to a boil. Drop the whole lobsters into the pot and cover. Let steam for about 10 minutes if you’re using new shell lobsters, or 12 minutes if you’re using hard shell. The lobsters will be bright red when they’re ready, and if you’re still unsure, you’ll know they are finished if you can easily pluck off their antennae.

Luke’s Lobster Roll
It’s said that the first lobster roll was sold in 1927, by Carl Simmons at Sim’s Lunch in Rockland, Maine. But it stands to reason that the lobster sandwich has been around much longer than that. For generations, lobstermen have lived on their catch, and it only makes sense that whatever didn’t get eaten at night was chilled and eaten in a sandwich the next day. The classic way, and for us, the only way, to eat a lobster roll is on a split-top New England bun. For those of you from other parts of the world, that’s a top-loading hot dog bun that sits upright on a flat bottom with bready (rather than crusty) sides. This allows you to butter and griddle the outside so it gets crisp and delicious.
We also follow the cardinal rule that nothing gets mixed with the lobster. If you like mayonnaise, you spread just a little on the inside of the bun, then you stuff in lobster meat (ideally the meat should be chilled but taken out of the fridge 10 minutes before serving). We use just the knuckle and claw meat because it’s more tender and easier to bite through in a sandwich. If you’re using tail, make sure you tear it into small bites. Finally, we add just a kiss of lemon butter and a modest sprinkle of seasoning to the top. When you’re using the best ingredient on the planet, you want to accent, not cover, the flavor. We like to round out the meal with kettle chips, pickles, and a good slaw.
Serves 4
Ingredients:
4 tablespoons (1/2 stick) unsalted butter
4 New England–style split-top hot dog buns
4 teaspoons mayonnaise
1 pound fresh cooked Maine lobster meat, chilled (you can buy it cooked, or use meat from a lobster you steamed yourself)
1 tablespoon fresh lemon juice
1/4 teaspoon dried oregano
1/4 teaspoon dried thyme
1/4 teaspoon celery salt
1/4 teaspoon freshly ground black pepper
In a small saucepan, melt the butter over low heat.
Brush half the butter onto the outer sides of your buns. Heat a 10- to 12-inch cast-iron pan over medium heat for 2 minutes, then toast the buns in the pan until golden brown, 1 to 2 minutes per side. Remove the buns from the pan and gently pry open the tops.
Spread about 1 teaspoon of the mayonnaise on the inside of each bun. Arrange a quarter of the lobster meat inside each bun. Reheat the remaining melted butter, if necessary, and stir in the lemon juice.
Drizzle the mixture evenly over the lobster in each sandwich. In a small bowl, stir together the oregano, thyme, celery salt, and pepper, then sprinkle a pinch of the seasoning mixture over each sandwich.

Seared Scallops with Fennel, Blood Orange, and Prosciutto
When pan seared, scallops take on an entirely different taste and texture than raw scallops. They’re light and almost fluffy on the interior, crisp on the exterior. They retain their delicious sweetness but also absorb the flavor of your frying vehicle of choice—in this case, the salty fat rendered from crisp fried prosciutto. The deglazed bits of scallop and prosciutto make for a decadent dressing over a crisp salad.
Serves 2 to 3
Ingredients:
5 tablespoons olive oil
4 slices prosciutto
1 pound dayboat scallops (about 10 scallops)
Fine sea salt and freshly ground black pepper
1 cup all-purpose flour
5 ounces mixed salad greens, such as arugula, endive, baby spinach, or baby chard
3/4 cup thinly sliced fennel
1 blood orange, cut into 1/4-inch slices, peel removed and segments cut into individual wedges
1 teaspoon lemon zest
2 tablespoons fresh lemon juice
1 teaspoon fresh thyme
In a 12-inch cast-iron pan, heat 1 tablespoon of the olive oil over medium heat. Add the prosciutto and cook until crisp and lightly browned on the bottom.
Flip and brown the second side, then remove from the pan to a paper towel and pat off any excess oil.
Add the remaining 4 tablespoons oil to the rendered fat in the pan and place over medium heat. Rinse the scallops under cold water and pat dry with a paper towel. Season the scallops with salt and pepper. Put the flour in a shallow bowl and roll the scallops in the flour to lightly coat. Cook the scallops in the oil until golden brown on both sides and opaque in the center, about 3 minutes per side. Transfer the scallops to a paper towel to drain excess oil. Remove the pan from the heat but do not drain or clean it.
In a salad bowl, toss together the greens, fennel, and blood orange and set aside.
Add the lemon zest, lemon juice, and thyme to the pan in which you cooked the scallops and bring to a boil. Deglaze the pan, scraping up any bits from the bottom. Remove from the heat and pour the mixture over the salad greens. Arrange the scallops atop.